Preferences
Make changes to channel settings graphically in the UI.
Plugin Type: Local
Preferences is a local plugin, which means it is associated with a
channel. An instance can be opened for each channel.
Usage
The Preferences plugin sets the preferences on a per-channel basis.
The preferences for a given channel are inherited from the “Image”
channel until they are explicitly set and saved using this plugin.
If “Save Settings” is pressed, it will save the settings to the user’s $HOME/.ginga folder (a “channel_NAME.cfg” file for each channel NAME) so that when a channel with the same name is created in future Ginga sessions it will obtain the same settings.
Color Distribution Preferences

“Color Distribution” preferences.
The “Color Distribution” preferences control the preferences used for the data value to color index conversion that occurs after cut levels are applied and just before final color mapping is performed. It concerns how the values between the low and high cut levels are distributed to the color and intensity mapping phase.
The “Algorithm” control is used to set the algorithm used for the mapping. Click the control to show the list, or simply scroll the mouse wheel while hovering the cursor over the control. There are eight algorithms available: linear, log, power, sqrt, squared, asinh, sinh, and histeq. The name of each algorithm is indicative of how the data is mapped to the colors in the color map. “linear” is the default.
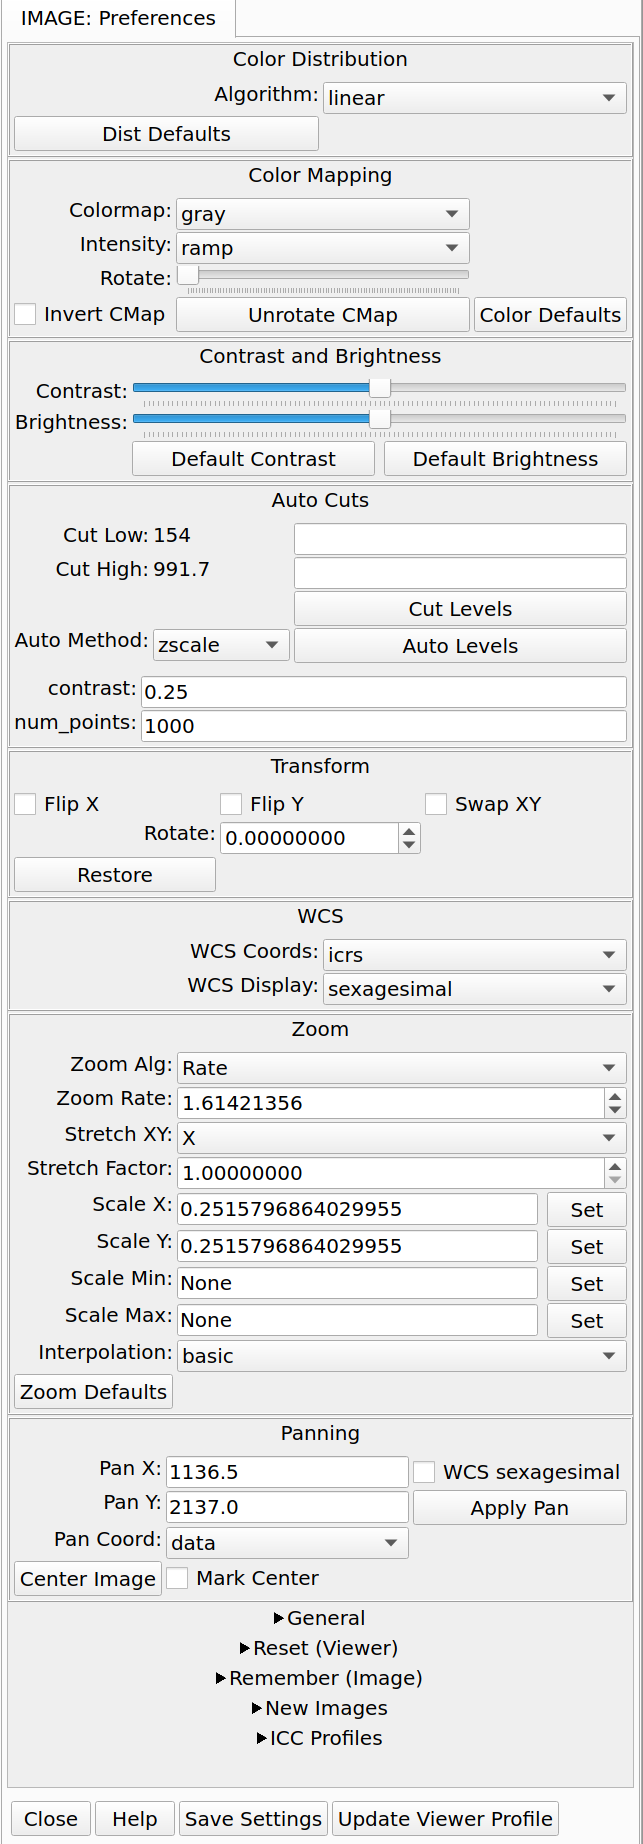
Color Mapping Preferences
“Color Mapping” preferences.
The “Color Mapping” preferences control the preferences used for the color map and intensity map, used during the final phase of the color mapping process. Together with the “Color Distribution” preferences, these control the mapping of data values into a 24-bpp RGB visual representation.
The “Colormap” control selects which color map should be loaded and used. Click the control to show the list, or simply scroll the mouse wheel while hovering the cursor over the control.
Note
Ginga comes with a good selection of color maps, but should you
want more, you can add custom ones or, if matplotlib is
installed, you can load all the ones that it has.
See “Customizing Ginga” for details.
The “Intensity” control selects which intensity map should be used with the color map. The intensity map is applied just before the color map, and can be used to change the standard linear scale of values into an inverted scale, logarithmic, etc.
The “Invert CMap” checkbox can be used to invert the selected color map (note that a number of colormaps are also selectable from the “Colormap” controlin inverted form).
The “Rotate” control can be used to rotate the colormap, while the “Unrotate CMap” button will restore the rotation to its default, unrotated state.
The “Color Defaults” button will reset all the color mapping controls to the default values: “gray” color map, “ramp” (linear) intensity, and no inversion or rotation of the color map.
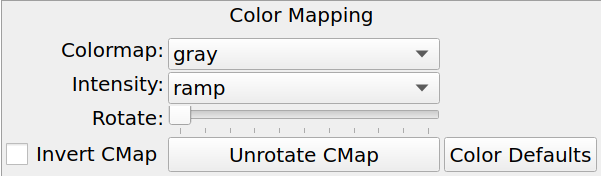
Contrast and Brightness (Bias) Preferences
“Contrast and Brightness (Bias)” preferences.
The “Contrast” and “Brightness” controls will set the contrast and brightness (aka “bias”) of the viewer. They offer an alternative to 1) using the contrast mode within the viewer window, or 2) manipulating the color bar by dragging (to set brightness/bias) or scrolling (to set contrast).
The “Default Contrast” and “Default Brightness” controls set their respective settings back to the default value.
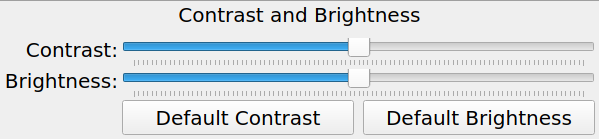
Auto Cuts Preferences
“Auto Cuts” preferences.
The “Auto Cuts” preferences control the calculation of cut levels for the view when the auto cut levels button or key is pressed, or when loading a new image with auto cuts enabled. You can also set the cut levels manually from here.
The “Cut Low” and “Cut High” fields can be used to manually specify lower and upper cut levels. Pressing “Cut Levels” will set the levels to these values manually. If a value is missing, it is assumed to default to the whatever the current value is.
Pressing “Auto Levels” will calculate the levels according to an algorithm. The “Auto Method” control is used to choose which auto cuts algorithm used: “minmax” (minimum maximum values), “median” (based on median filtering), “histogram” (based on an image histogram), “stddev” (based on the standard deviation of pixel values), or “zscale” (based on the ZSCALE algorithm popularized by IRAF). As the algorithm is changed, the boxes under it may also change to allow changes to parameters particular to each algorithm.
Transform Preferences
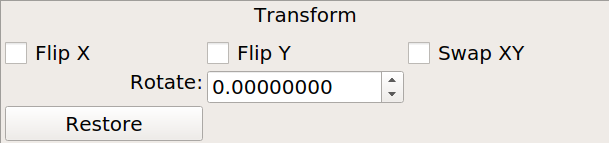
“Transform” preferences.
The “Transform” preferences provide for transforming the view of the image by flipping the view in X or Y, swapping the X and Y axes, or rotating the image in arbitrary amounts.
The “Flip X” and “Flip Y” checkboxes cause the image view to be flipped in the corresponding axis.
The “Swap XY” checkbox causes the image view to be altered by swapping the X and Y axes. This can be combined with “Flip X” and “Flip Y” to rotate the image in 90 degree increments. These views will render more quickly than arbitrary rotations using the “Rotate” control.
The “Rotate” control will rotate the image view the specified amount. The value should be specified in degrees. “Rotate” can be specified in conjunction with flipping and swapping.
The “Restore” button will restore the view to the default view, which is unflipped, unswapped, and unrotated.
WCS Preferences

“WCS” preferences.
The “WCS” preferences control the display preferences for the World Coordinate System (WCS) calculations used to report the cursor position in the image.
The “WCS Coords” control is used to select the coordinate system in which to display the result.
The “WCS Display” control is used to select a sexagesimal (H:M:S)
readout or a decimal degrees readout.
Zoom Preferences
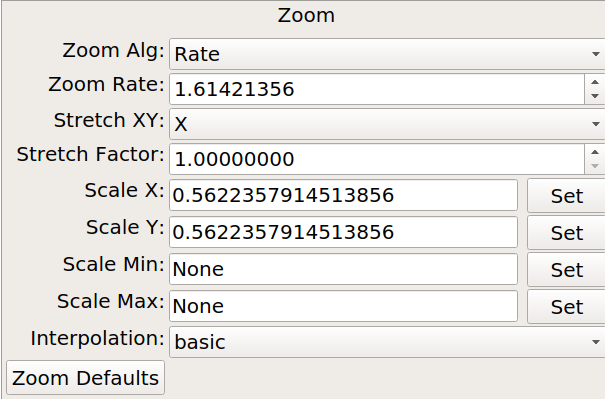
“Zoom” preferences.
The “Zoom” preferences control Ginga’s zooming/scaling behavior. Ginga supports two zoom algorithms, chosen using the “Zoom Alg” control:
The “step” algorithm zooms the image inwards in discrete steps of 1X, 2X, 3X, etc. or outwards in steps of 1/2X, 1/3X, 1/4X, etc. This algorithm results in the least artifacts visually, but is a bit slower to zoom over wide ranges when using a scrolling motion because more “throw” is required to achieve a large zoom change (this is not the case if one uses of the shortcut zoom keys, such as the digit keys).
The “rate” algorithm zooms the image by advancing the scaling at a rate defined by the value in the “Zoom Rate” box. This rate defaults to the square root of 2. Larger numbers cause larger changes in scale between zoom levels. If you like to zoom your images rapidly, at a small cost in image quality, you would likely want to choose this option.
Note that regardless of which method is chosen for the zoom algorithm,
the zoom can be controlled by holding down Ctrl (coarse) or Shift
(fine) while scrolling to constrain the zoom rate (assuming the default
mouse bindings).
The “Stretch XY” control can be used to stretch one of the axes (X or Y) relative to the other. Select an axis with this control and roll the scroll wheel while hovering over the “Stretch Factor” control to stretch the pixels in the selected axis.
The “Scale X” and “Scale Y” controls offer direct access to the underlying scaling, bypassing the discrete zoom steps. Here, exact values can be typed to scale the image. Conversely, you will see these values change as the image is zoomed.
The “Scale Min” and “Scale Max” controls can be used to place a limit on how much the image can be scaled.
The “Interpolation” control allows you to choose how the image will be interpolated. Depending on which support packages are installed, the following choices can be made:
“basic” is nearest-neighbor using a built in algorithm, this is always available, is reasonably fast, and is the default.
“area”
“bicubic”
“lanczos”
“linear”
“nearest” is nearest-neighbor (using support package)
The “Zoom Defaults” button will restore the controls to the Ginga default values.
Pan Preferences
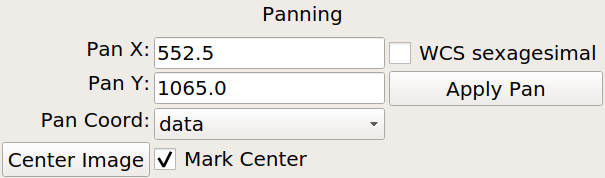
“Pan” preferences.
The “Pan” preferences control Ginga’s panning behavior.
The “Pan X” and “Pan Y” controls offer direct access to set the pan position in the image (the part of the image located at the center of the window) – you can see them change as you pan around the image. You can set these values and then press “Apply Pan” to pan to that exact position.
If the “Pan Coord” control is set to “data” then panning is controlled by data coordinates in the image; if set to “WCS” then the values shown in the “Pan X” and “Pan Y” controls will be WCS coordinates (assuming a valid WCS is in the image). In the latter case, the “WCS sexagesimal” control can be left unchecked to show/set the coordinates in degrees, or checked to show/set the values in standard sexigesimal notation.
The “Center Image” button sets the pan position to the center of the image, as calculated by halving the dimensions in X and Y.
The “Mark Center” check box, when checked, will cause Ginga to draw a small reticle in the center of the image. This is useful for knowing the pan position and for debugging.
General Preferences
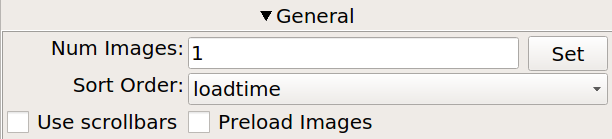
“General” preferences.
The “Num Images” setting specifies how many images can be retained in buffers in this channel before being ejected. A value of zero (0) means unlimited–images will never be ejected. If an image was loaded from some accessible storage and it is ejected, it will automatically be reloaded if the image is revisited by navigating the channel.
The “Sort Order” setting determines whether images are sorted in the channel alphabetically by name or by the time when they were loaded. This principally affects the order in which images are cycled when using the up/down “arrow” keys or buttons, and not necessarily how they are displayed in plugins like “Contents” or “Thumbs” (which generally have their own setting preference for ordering).
The “Use scrollbars” check box controls whether the channel viewer will show scroll bars around the edge of the viewer frame to pan the image.
Reset (Viewer) Preferences
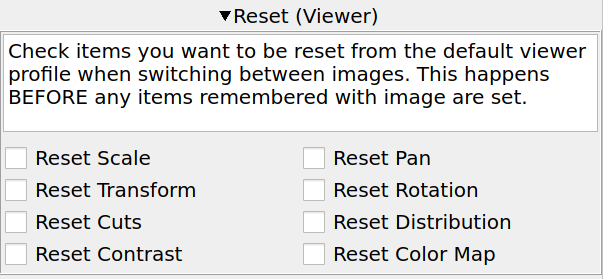
“Reset” (Viewer) preferences.
Each channel viewer has a viewer profile that is initialized to the state of the viewer just after creation and the restoration of saved settings for that channel. When switching between images, the attributes of the viewer can be reset to this profile according to the checked boxes in this section. If nothing is checked, nothing will be reset from the viewer profile.
To use this feature, set your viewer preferences as you prefer and click the “Update Viewer Profile” button at the bottom of the plugin. Now check which items should be reset to those values between images. Finally, click the “Save Settings” button at the bottom if you want these settings to be persistent across Ginga restarts and set as the default user profile for this channel when you restart ginga and recreate this channel.
“Reset Scale” will reset the zoom (scale) level to the viewer profile
“Reset Pan” will reset the pan position to the viewer profile
“Reset Transform” will reset any flip/swap transforms to the viewer profile
“Reset Rotation” will reset any rotation to the viewer profile
“Reset Cuts” will reset any cut levels to the viewer profile
“Reset Distribution” will reset any color distribution to the viewer profile
“Reset Contrast” will reset any contrast/bias to the viewer profile
“Reset Color Map” will reset any color map settings to the viewer profile
Tip
If you use this feature you may also want to set “Remember (Image) Preferences” (see below).
Note
The complete order of adjustments is:
any reset items from the default viewer profile, if any
any remembered items from the image profile are applied, if any
any auto adjustments (cuts/zoom/center) are applied, if they were not overridden by a remembered setting
Remember (Image) Preferences
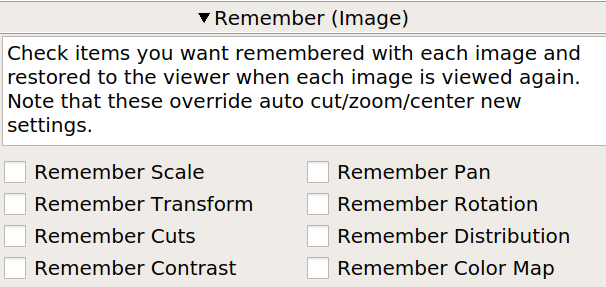
“Remember” (Image) preferences.
When an image is loaded, an image profile is created and attached to the image metadata in the channel. These profiles are continuously updated with viewer state as the image is manipulated. The “Remember” preferences control which attributes of these profiles are restored to the viewer state when the image is navigated (back) to in the channel:
“Remember Scale” will restore the zoom (scale) level of the image
“Remember Pan” will restore the pan position in the image
“Remember Transform” will restore any flip or swap axes transforms
“Remember Rotation” will restore any rotation of the image
“Remember Cuts” will restore any cut levels for the image
“Remember Distribution” will restore any color distribution (linear,log,etc)
“Remember Contrast” will restore any contrast/bias adjustment
“Remember Color Map” will restore any color map choices made
If nothing is checked, nothing will be restored from the image profile.
Note
These items will be set BEFORE any auto (cut/zoom/center new) adjustments are made. If a remembered item is set, it will override any auto adjustment setting for the channel.
Tip
If you use this feature you may also want to set “Reset (Viewer) Preferences” (see above).
*An Example*
As an example of using the Reset and Remember settings, suppose that you frequently use the contrast adjustment. You would like the contrast that you set with a particular image to be restored when that image is viewed again. However, when you view a new image, you would like the contrast to start out at some normal setting.
To accomplish this, manually reset the contrast to the desired default setting. Check “Reset Contrast” and then press “Update Viewer Profile”. Finally, check “Remember Contrast”. Click “Save Settings” to make the channel settings persistent.
New Image Preferences
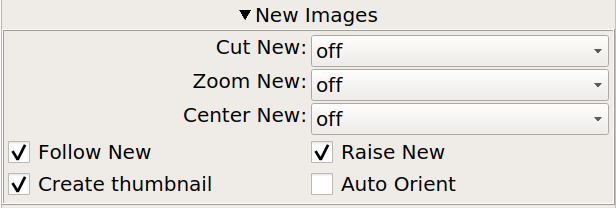
“New Image” preferences.
The “New Images” preferences determine how Ginga reacts when a new image is loaded into the channel. This includes when an older image is revisited by clicking on its thumbnail in the ``Thumbs`` plugin or double-clicking on it’s name in the ``Contents`` plugin.
The “Cut New” setting controls whether an automatic cut-level calculation should be performed on the new image, or whether the currently set cut levels should be applied. The possible settings are:
“off”: always use the currently set cut levels;
“once”: calculate a new cut levels for the first image visited, then turn “off”;
“override”: calculate a new cut levels until the user overrides it by manually setting a cut levels, then turn “off”; or
“on”: calculate a new cut levels always.
Tip
The “override” setting is provided for the convenience of
having automatic cut levels, while preventing a manually set
cuts from being overridden when a new image is ingested. When
typed in the image window, the semicolon key can be used to
toggle the mode back to override (from “off”), while colon will
set the preference to “on”. The Info (tab: Synopsis) plugin
shows the state of this setting.
The “Zoom New” setting controls whether visiting an image should set the zoom level to fit the image to the window. The possible settings are:
“off”: always use the currently set zoom levels;
“once”: fit the first image to the window, then turn to “off”;
“override”: images are automatically fitted until the zoom level is changed manually, then the mode automatically changes to “off”, or
“on”: the new image is always zoomed to fit.
Tip
The “override” setting is provided for the convenience of
having an automatic zoom, while preventing a manually set zoom
level from being overridden when a new image is ingested. When
typed in the image window, the apostrophe (a.k.a. “single quote”)
key can be used to toggle the mode back to “override” (from
“off”), while quote (a.k.a. double quote) will set the preference
to “on”. The Info (tab: Synopsis) plugin shows the state of
this setting.
The “Center New” setting controls whether visiting an image should cause the pan position to be reset to the center of the image. The possible settings are:
“off”: leave the current pan position as is;
“once”: center the first image visited, then turn to “off”;
“override”: images are automatically centered until the pan position is changed manually, then the mode automatically changes to “off”, or
“on”: the new image is always centered.
The “Follow New” setting is used to control whether Ginga will change
the display if a new image is loaded into the channel. If unchecked,
the image is loaded (as seen, for example, by its appearance in the
Thumbs tab), but the display will not change to the new image. This
setting is useful in cases where new images are being loaded by some
automated means into a channel and the user wishes to study the current
image without being interrupted.
The “Raise New” setting controls whether Ginga will raise the tab of a channel when an image is loaded into that channel. If unchecked, then Ginga will not raise the tab when an image is loaded into that particular channel.
The “Create Thumbnail” setting controls whether Ginga will create a thumbnail for images loaded into that channel. In cases where many images are being loaded into a channel frequently (e.g., a low frequency video feed), it may be undesirable to create thumbnails for all of them.
The “Auto Orient” setting controls whether Ginga should attempt to orient images by default according to image metadata. This is currently only useful for RGB (e.g. JPEG) images that contain such metadata. It does not auto orient by WCS, at present.
ICC Profiles Preferences
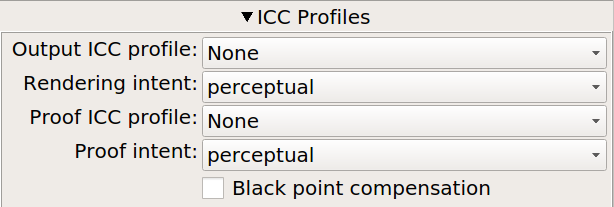
“ICC Profiles” preferences.
Ginga can make use of ICC (color management) profiles in the rendering chain using the LittleCMS library.
Note
To make use of ICC profiles, create a “profiles” folder in the Ginga “home” (usually $HOME/.ginga) and put any necessary profiles there. A working profile should be set by adding a value for “icc_working_profile” in your $HOME/.ginga/general.cfg file– do not include any leading path, just the filename of an ICC file in the profiles folder. This will be used to convert any RGB files containing a profile to the working profile.
You can set the output profiles for any channel in this section of the Preferences plugin.
The “Output ICC profile” control selects which profile to use for the output rendering to the display. The choices are from your profile files in $HOME/.ginga/profiles. Normally this should be a display profile.
The “Rendering intent” control chooses the algorithm used to render the color in the ICC conversion process. The choices are:
absolute_colorimetric
perceptual
relative_colorimetric
saturation
The “Proof ICC profile” and “Proof intent” are similarly chosen for proofing.
The “Black point compensation” checkbox turns on or off this feature in the color conversion process. See the documentation for LittleCMS or ICC color management in general for details on these choices.