Developing with Ginga
Developers interested in using Ginga in their project will probably follow one of two logical development paths:
using Ginga toolkit classes in a program of their own design, or
starting with the full-featured reference viewer that comes with Ginga and customizing it for some special purpose, typically by modifying one of the plugins or writing a new plugin.
The first approach is probably best for when the developer has a custom application in mind, needs a minimal but powerful viewer or wants to develop an entirely new full-featured viewer. Developers interested in this direction should head over to the chapter on the viewer object (see Using the Basic Ginga Viewer Object in Python Programs).
The second approach is probably best for end users or developers that are mostly satisfied with the reference viewer as a general purpose tool and want to add some specific enhancements or functionality. Because the reference viewer is based on a flexible plugin architecture this is fairly straightforward to do.
Writing plugins for the reference viewer
The philosophy behind the design of the reference viewer distributed with the Ginga is that it is simply a flexible layout shell for instantiating instances of the Ginga view widgets described in the earlier section. All of the other important pieces of a modern FITS viewer–a panning widget, information panels, zoom widget, analysis panes–are implemented as plugins: encapsulated modules that interface with the viewing shell using a standardized API. This makes it easy to customize and to add, change or remove functionality in a very modular, flexible way.
The Ginga viewer divides the application window GUI into containers that hold either viewing widgets or plugins. The view widgets are called “channels” in the viewer nomenclature, and are a means of organizing images in the viewer, functioning much like “frames” in other viewers. A channel has a name and maintains its own history of images that have cycled through it. The user can create new channels as needed. For example, they might use different channels for different kinds of images: camera vs. spectrograph, or channels organized by CCD, or by target, or raw data vs. quick look, etc. In the default layout, the channel tabs are in the large middle pane, while the plugins occupy the left and right panes. Other layouts are possible, by simply changing a table used in the startup script.
Ginga distinguishes between two types of plugin: global and local. Global plugins are used where the functionality is generally enabled during the entire session with the viewer and where the plugin is active no matter which channel is currently under interaction with the user. Examples of global plugins include a panning view (a small, bird’s-eye view of the image that shows a panning rectangle and allows graphical positioning of the pan region), a zoomed view (that shows an enlarged cutout of the area currently under the cursor), informational displays about world coordinates, FITS headers, thumbnails, etc. Figure Two global plugins: Pan (top) and Info (bottom), shown sharing a tab. shows an example of two global plugins occupying a notebook tab.
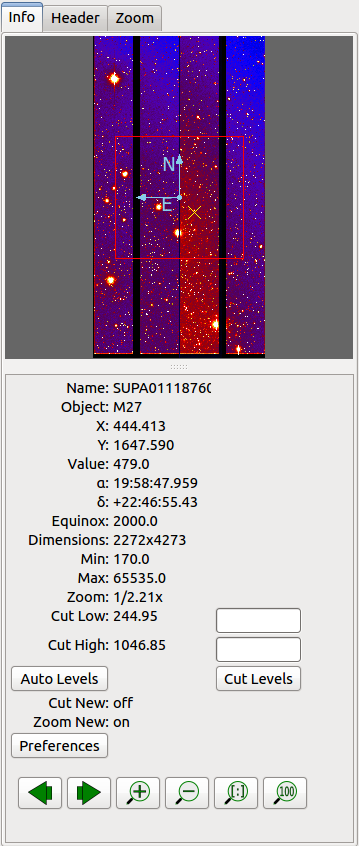
Two global plugins: Pan (top) and Info (bottom), shown sharing a tab.
Local plugins are used for modal operations with images in specific channels. For example, the Pick plugin is used to perform stellar evaluation of objects, finding the center of the object and giving informational readings of the exact celestial coordinates, image quality, etc. The Pick plugin is only visible while the user has it open, and does not capture the mouse actions unless the channel it is operating on is selected and the particular instance of the Pick plugin is activated. Thus one can have two different Pick operations going on concurrently on two different channels, for example, or a Pick operation in a camera channel, and a Cuts (line cuts) operation on a spectrograph channel. Figure The Pick local plugin, shown occupying a tab. shows an example of the Pick local plugin occupying a notebook tab.

The Pick local plugin, shown occupying a tab.
Global and local plugins are further distinguished by whether they are a
singleton (the default case) or not. If a global plugin is a singleton, then
only one instance of it can be opened; if not, then multiple instances of it
can be opened. If a local plugin is a singleton, then only one instance of it
can be opened per channel; if not, then multiple instances can be opened per
channel. Pick is an example of a non-singleton local plugin.
Anatomy of a Local Ginga Plugin
Let’s take a look at a local plugin to understand the API for interfacing to the Ginga shell. In Listing 2, we show a stub for a local plugin.
from ginga import GingaPlugin

class MyPlugin(GingaPlugin.LocalPlugin):

    def __init__(self, fv, image_viewer, ident=None):
        super(MyPlugin, self).__init__(fv, image_viewer, ident=ident)

    def build_gui(self, container):
        pass

    def start(self):
        pass

    def stop(self):
        pass

    def pause(self):
        pass

    def resume(self):
        pass

    def redo(self):
        pass
A little more fleshed out example: MyLocalPlugin
This is a skeleton for a local plugin. It is also good example of something that actually runs and can be copied as a template for a local plugin. This plugin is distributed with the Ginga package and can be loaded and invoked from a terminal:
ginga --plugins=MyLocalPlugin --loglevel=20 --log=/tmp/ginga.log
The plugin will be accessible via the “Operation” button in the Plugin Manager bar.
from ginga import GingaPlugin
from ginga.misc import Widgets

# import any other modules you want here--it's a python world!

class MyLocalPlugin(GingaPlugin.LocalPlugin):

    def __init__(self, fv, image_viewer, ident=None):
        """
        This method is called when the plugin is loaded for the  first
        time.  ``fv`` is a reference to the Ginga (reference viewer) shell
        and ``image_viewer`` is a reference to the specific viewer
        object associated with the channel on which the plugin is being
        invoked. ``ident`` should be present as a keyword parameter
        initialized to None.  It will be passed in by the plugin manager.
        You need to call the superclass initializer and then do any local
        initialization.
        """
        super().__init__(fv, image_viewer, ident=ident)

        # your local state and initialization code goes here

    def build_gui(self, container):
        """
        This method is called when the plugin is invoked.  It builds the
        GUI used by the plugin into the widget layout passed as
        ``container``.
        This method may be called many times as the plugin is opened and
        closed for modal operations.  The method may be omitted if there
        is no GUI for the plugin.

        This specific example uses the GUI widget set agnostic wrappers
        to build the GUI, but you can also just as easily use explicit
        toolkit calls here if you only want to support one widget set.
        """
        top = Widgets.VBox()
        top.set_border_width(4)

        # this is a little trick for making plugins that work either in
        # a vertical or horizontal orientation.  It returns a box container,
        # a scroll widget and an orientation ('vertical', 'horizontal')
        vbox, sw, orientation = Widgets.get_oriented_box(container)
        vbox.set_border_width(4)
        vbox.set_spacing(2)

        # Take a text widget to show some instructions
        self.msgFont = self.fv.getFont("sansFont", 12)
        tw = Widgets.TextArea(wrap=True, editable=False)
        tw.set_font(self.msgFont)
        self.tw = tw

        # Frame for instructions and add the text widget with another
        # blank widget to stretch as needed to fill emp
        fr = Widgets.Frame("Instructions")
        vbox2 = Widgets.VBox()
        vbox2.add_widget(tw)
        vbox2.add_widget(Widgets.Label(''), stretch=1)
        fr.set_widget(vbox2)
        vbox.add_widget(fr, stretch=0)

        # Add a spacer to stretch the rest of the way to the end of the
        # plugin space
        spacer = Widgets.Label('')
        vbox.add_widget(spacer, stretch=1)

        # scroll bars will allow lots of content to be accessed
        top.add_widget(sw, stretch=1)

        # A button box that is always visible at the bottom
        btns = Widgets.HBox()
        btns.set_spacing(3)

        # Add a close button for the convenience of the user
        btn = Widgets.Button("Close")
        btn.add_callback('activated', lambda w: self.close())
        btns.add_widget(btn, stretch=0)
        btns.add_widget(Widgets.Label(''), stretch=1)
        top.add_widget(btns, stretch=0)

        # Add our GUI to the container
        container.add_widget(top, stretch=1)
        # NOTE: if you are building a GUI using a specific widget toolkit
        # (e.g. Qt) GUI calls, you need to extract the widget or layout
        # from the non-toolkit specific container wrapper and call on that
        # to pack your widget, e.g.:
        #cw = container.get_widget()
        #cw.addWidget(widget, stretch=1)

    def close(self):
        """
        Example close method.  You can use this method and attach it as a
        callback to a button that you place in your GUI to close the plugin
        as a convenience to the user.
        """
        chname = self.fv.get_channel_name(self.fitsimage)
        self.fv.stop_local_plugin(chname, str(self))
        return True

    def start(self):
        """
        This method is called just after ``build_gui()`` when the plugin
        is invoked.  This method may be called many times as the plugin is
        opened and closed for modal operations.  This method may be omitted
        in many cases.
        """
        self.tw.set_text("""This plugin doesn't do anything interesting.""")
        self.resume()

    def pause(self):
        """
        This method is called when the plugin loses focus.
        It should take any actions necessary to stop handling user
        interaction events that were initiated in ``start()`` or
        ``resume()``.
        This method may be called many times as the plugin is focused
        or defocused.  It may be omitted if there is no user event handling
        to disable.
        """
        pass

    def resume(self):
        """
        This method is called when the plugin gets focus.
        It should take any actions necessary to start handling user
        interaction events for the operations that it does.
        This method may be called many times as the plugin is focused or
        defocused.  The method may be omitted if there is no user event
        handling to enable.
        """
        pass

    def stop(self):
        """
        This method is called when the plugin is stopped.
        It should perform any special clean up necessary to terminate
        the operation.  The GUI will be destroyed by the plugin manager
        so there is no need for the stop method to do that.
        This method may be called many  times as the plugin is opened and
        closed for modal operations, and may be omitted if there is no
        special cleanup required when stopping.
        """
        pass

    def redo(self):
        """
        This method is called when the plugin is active and a new
        image is loaded into the associated channel.  It can optionally
        redo the current operation on the new image.  This method may be
        called many times as new images are loaded while the plugin is
        active.  This method may be omitted.
        """
        pass

    def __str__(self):
        """
        This method should be provided and should return the lower case
        name of the plugin.
        """
        return 'mylocalplugin'
The instance variables “fv” and “image_viewer” will be assigned by the superclass initializer to self.fv and self.fitsimage–these are the reference viewer “shell” and the ginga channel image display viewer respectively. To interact with the viewer you will be calling methods on one or both of these objects.
The “fitsimage” object is the ginga image viewer object associated with the channel. You can get a good idea of how to programmatically manipulate this viewer here Ginga Image Viewer Operations and by browsing the source of the many plugins distributed with Ginga. Most of them are not very long or complex. Also, a plugin can include any Python packages or modules that it wants and programming one is essentially similar to writing any other Python program. We suggest picking a plugin that looks or does something similar to what you are interested in, copying it, and modifying it to fit your needs.
Launching and Debugging Your Plugin
The easiest way to start out is to create a plugins directory under your ginga configuration area. In a terminal:
mkdir $HOME/.ginga/plugins
Put your plugin in there (a good one to start with is to modify the MyLocalPlugin example that comes with Ginga):
cd .../ginga/examples/reference-viewer
cp MyLocalPlugin.py $HOME/.ginga/plugins/MyPlugin.py
To load it when the reference viewer starts (and add some logging to stderr as well as to a file):
ginga --plugins=MyPlugin --loglevel=20 --stderr --log=/tmp/ginga.log
To start the plugin from within the reference viewer, use the Plugin Manager bar just below the color and readout bars. Use the “Operation” menu to select your plugin and it should be launched in the right panel.
If you don’t see the name of your plugin in the Operation menu, then there was probably an error trying to load it. Examine the log and search for the name of your plugin–you should find some error message associated with it.
If you select your plugin from the menu, but it doesn’t launch a GUI, there may be a problem or error in the plugin file. Again, examine the log and search for the name of your plugin–you should find some error message associated with it. It may help for you to add some debugging messages to your plugin (either using self.logger.debug(”…”) or simple print statements to stdout) to gauge the progress of building the gui and plugin starting.
If the plugin launches, but encounters an error building the GUI, it should show some error messages (and probably a stack trace) in placeholders in the right panel in the container where it tried to build the GUI or possibly under the Errors tab.
Note
Ginga has a feature for quickly reloading plugins to facilitate rapid debugging cycles. If it is not already running, start the “Command Line” plugin from the “Plugins->Debug” menu in the menu bar. If your plugin launched (but has some error), make sure you have closed your plugin by right clicking (or Control + click on Mac touchpad) on the small box representing your plugin in the Plugin Manager bar and selecting “Stop”. In the Command Line plugin, there is a small box labeled “Type command here:”. Use the command “reload_local <plugin_name>”–this will reload the python module representing your plugin and you should be able to immediately restart it using the Plugin Manager bar as described above (if the plugin is of the global plugin variety, use the command “reload_global” instead).
If you have edited third party modules that are included in the plugin, this will not be enough to pick up those changes.
A more complex example: The Ruler Plugin
Finally, in Listing 3 we show a completed plugin for Ruler. The
purpose of this plugin to draw triangulation (distance measurement)
rulers on the image. For reference, you may want to refer to the ruler
shown in The Ruler local plugin GUI, shown occupying a tab..
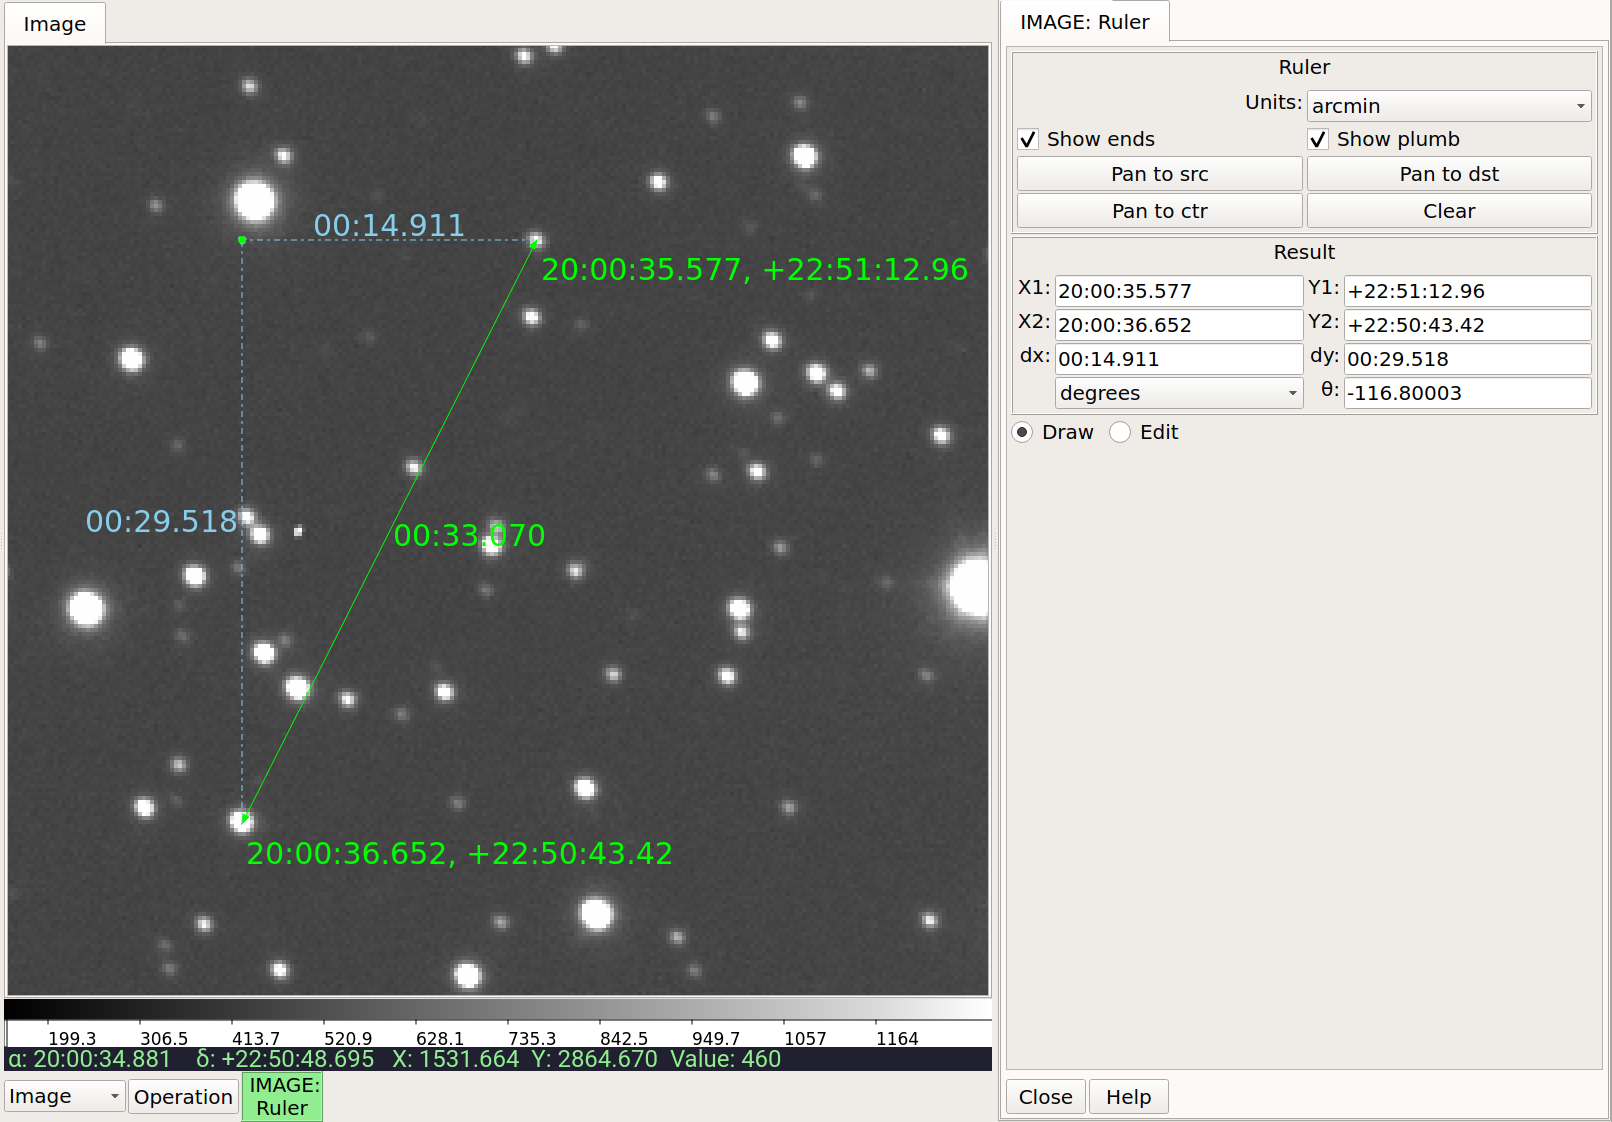
The Ruler local plugin GUI, shown occupying a tab.
#
# Ruler.py -- Ruler plugin for Ginga reference viewer
#
from ginga import GingaPlugin
from ginga.gw import Widgets

class Ruler(GingaPlugin.LocalPlugin):

    def __init__(self, fv, image_viewer, ident=None):
        # superclass defines some variables for us, like logger
        super().__init__(fv, image_viewer, ident=ident)

        self.rulecolor = 'green'
        self.layertag = f'{self.ident}-canvas'
        self.ruletag = None

        self.dc = fv.get_draw_classes()
        canvas = self.dc.DrawingCanvas()
        canvas.enable_draw(True)
        canvas.enable_edit(True)
        canvas.set_drawtype('ruler', color='cyan')
        canvas.set_callback('draw-event', self.wcsruler)
        canvas.set_callback('draw-down', self.clear)
        canvas.set_callback('edit-event', self.edit_cb)
        canvas.set_draw_mode('draw')
        canvas.set_surface(self.fitsimage)
        canvas.register_for_cursor_drawing(self.fitsimage)
        canvas.name = 'Ruler-canvas'
        self.canvas = canvas

        self.w = None
        self.unittypes = ('arcmin', 'degrees', 'pixels')
        self.units = 'arcmin'

    def build_gui(self, container):
        top = Widgets.VBox()
        top.set_border_width(4)

        vbox, sw, orientation = Widgets.get_oriented_box(container)
        vbox.set_border_width(4)
        vbox.set_spacing(2)

        self.msgFont = self.fv.get_font("sansFont", 12)
        tw = Widgets.TextArea(wrap=True, editable=False)
        tw.set_font(self.msgFont)
        self.tw = tw

        fr = Widgets.Expander("Instructions")
        fr.set_widget(tw)
        vbox.add_widget(fr, stretch=0)

        fr = Widgets.Frame("Ruler")

        captions = (('Units:', 'label', 'Units', 'combobox'),
                    )
        w, b = Widgets.build_info(captions, orientation=orientation)
        self.w = b

        combobox = b.units
        for name in self.unittypes:
            combobox.append_text(name)
        index = self.unittypes.index(self.units)
        combobox.set_index(index)
        combobox.add_callback('activated', lambda w, idx: self.set_units())

        fr.set_widget(w)
        vbox.add_widget(fr, stretch=0)

        mode = self.canvas.get_draw_mode()
        hbox = Widgets.HBox()
        btn1 = Widgets.RadioButton("Draw")
        btn1.set_state(mode == 'draw')
        btn1.add_callback('activated', lambda w, val: self.set_mode_cb('draw', val))
        btn1.set_tooltip("Choose this to draw a ruler")
        self.w.btn_draw = btn1
        hbox.add_widget(btn1)

        btn2 = Widgets.RadioButton("Edit", group=btn1)
        btn2.set_state(mode == 'edit')
        btn2.add_callback('activated', lambda w, val: self.set_mode_cb('edit', val))
        btn2.set_tooltip("Choose this to edit a ruler")
        self.w.btn_edit = btn2
        hbox.add_widget(btn2)

        hbox.add_widget(Widgets.Label(''), stretch=1)
        vbox.add_widget(hbox, stretch=0)

        spacer = Widgets.Label('')
        vbox.add_widget(spacer, stretch=1)

        top.add_widget(sw, stretch=1)

        btns = Widgets.HBox()
        btns.set_spacing(3)

        btn = Widgets.Button("Close")
        btn.add_callback('activated', lambda w: self.close())
        btns.add_widget(btn, stretch=0)
        btns.add_widget(Widgets.Label(''), stretch=1)
        top.add_widget(btns, stretch=0)

        container.add_widget(top, stretch=1)

    def set_units(self):
        index = self.w.units.get_index()
        units = self.unittypes[index]
        self.canvas.set_drawtype('ruler', color='cyan', units=units)

        if self.ruletag is not None:
            obj = self.canvas.get_object_by_tag(self.ruletag)
            if obj.kind == 'ruler':
                obj.units = units
                self.canvas.redraw(whence=3)
        return True

    def close(self):
        chname = self.fv.get_channel_name(self.fitsimage)
        self.fv.stop_local_plugin(chname, str(self))
        return True

    def instructions(self):
        self.tw.set_text("""Draw (or redraw) a line with the cursor.

Display the Zoom tab at the same time to precisely see detail while drawing.""")

    def start(self):
        self.instructions()
        # start ruler drawing operation
        p_canvas = self.fitsimage.get_canvas()
        if not p_canvas.has_object(self.canvas):
            p_canvas.add(self.canvas, tag=self.layertag)

        self.canvas.delete_all_objects()
        self.resume()

    def pause(self):
        self.canvas.ui_set_active(False)

    def resume(self):
        self.canvas.ui_set_active(True)
        self.fv.show_status("Draw a ruler with the right mouse button")

    def stop(self):
        # remove the canvas from the image
        p_canvas = self.fitsimage.get_canvas()
        try:
            p_canvas.delete_object_by_tag(self.layertag)
        except:
            pass
        self.canvas.ui_set_active(False)
        self.fv.show_status("")

    def redo(self):
        obj = self.canvas.get_object_by_tag(self.ruletag)
        if obj.kind != 'ruler':
            return True
        # redraw updates ruler measurements
        self.canvas.redraw(whence=3)

    def clear(self, canvas, button, data_x, data_y):
        self.canvas.delete_all_objects()
        self.ruletag = None
        return False

    def wcsruler(self, surface, tag):
        obj = self.canvas.get_object_by_tag(tag)
        if obj.kind != 'ruler':
            return True
        # remove the old ruler
        try:
            self.canvas.delete_object_by_tag(self.ruletag)
        except:
            pass

        # change some characteristics of the drawn image and
        # save as the new ruler
        self.ruletag = tag
        obj.color = self.rulecolor
        obj.cap = 'ball'
        self.canvas.redraw(whence=3)

    def edit_cb(self, canvas, obj):
        self.redo()
        return True

    def edit_select_ruler(self):
        if self.ruletag is not None:
            obj = self.canvas.get_object_by_tag(self.ruletag)
            self.canvas.edit_select(obj)
        else:
            self.canvas.clear_selected()
        self.canvas.update_canvas()

    def set_mode_cb(self, mode, tf):
        if tf:
            self.canvas.set_draw_mode(mode)
            if mode == 'edit':
                self.edit_select_ruler()
        return True

#END
This plugin shows a standard design pattern typical to local plugins.
Often one is wanting to draw or plot something on top of the image
below. The CanvasView widget used by Ginga allows this to be
done very cleanly and conveniently by adding a DrawingCanvas
object to the image and drawing on that. Canvases can be layered on top
of each other in a manner analogous to “layers” in an image editing
program. Since each local plugin maintains it’s own canvas, it is very
easy to encapsulate the logic for drawing on and dealing with the
objects associated with that plugin. We use this technique in the Ruler
plugin. When the plugin is loaded (refer to __init__() method), it
creates a canvas, enables drawing on it, sets the draw type and registers a
callback for drawing events. When start() is called it adds that canvas
to the widget. When stop() is called it removes the canvas from the
widget (but does not destroy the canvas). pause() disables user
interaction on the canvas and resume() reenables that interaction.
redo() simply redraws the ruler with new measurements taken from any new
image that may have been loaded. In the __init__() method you will
notice a set_surface() call that associates this canvas with a
ImageView-based widget–this is the key for the canvas to utilize WCS
information for correct plotting.
All the other methods shown are support methods for doing the ruler
drawing operation and interacting with the plugin GUI.
Writing a Global Plugin
The last example was focused on writing a local plugin. Global plugins
employ a nearly identical API to that shown in Listing 2, except that
the constructor does not take a image_viewer parameter.
pause() and resume() can safely be omitted. Like local plugins,
build_gui() can be omitted if there is no GUI associated with the plugin.
A template: MyGlobalPlugin
This is a skeleton for a global plugin, and serves as a decent example of something that can be copied as a template for a global plugin. This plugin is distributed with the Ginga package and can be loaded and invoked from a terminal:
ginga --modules=MyGlobalPlugin --loglevel=20 --log=/tmp/ginga.log
The plugin will be started at program startup and can be seen in the “MyGlobalPlugin” tab in the right panel. Watch the status message as you create new channels, delete channels or load images into channels.
from ginga import GingaPlugin
from ginga.misc import Widgets

# import any other modules you want here--it's a python world!

class MyGlobalPlugin(GingaPlugin.GlobalPlugin):

    def __init__(self, fv, ident=None):
        """
        This method is called when the plugin is loaded for the  first
        time.  ``fv`` is a reference to the Ginga (reference viewer) shell.
        ``ident`` should be present as a keyword parameter initialized to
        None.  It will be passed in by the plugin manager.

        You need to call the superclass initializer and then do any local
        initialization.
        """
        super().__init__(fv, ident=ident)

        # Your initialization here

        # Create some variables to keep track of what is happening
        # with which channel
        self.active = None

        # Subscribe to some interesting callbacks that will inform us
        # of channel events.  You may not need these depending on what
        # your plugin does
        fv.set_callback('add-channel', self.add_channel)
        fv.set_callback('delete-channel', self.delete_channel)
        fv.set_callback('active-image', self.focus_cb)

    def build_gui(self, container):
        """
        This method is called when the plugin is invoked.  It builds the
        GUI used by the plugin into the widget layout passed as
        ``container``.
        This method could be called several times if the plugin is opened
        and closed.  The method may be omitted if there is no GUI for the
        plugin.

        This specific example uses the GUI widget set agnostic wrappers
        to build the GUI, but you can also just as easily use explicit
        toolkit calls here if you only want to support one widget set.
        """
        top = Widgets.VBox()
        top.set_border_width(4)

        # this is a little trick for making plugins that work either in
        # a vertical or horizontal orientation.  It returns a box container,
        # a scroll widget and an orientation ('vertical', 'horizontal')
        vbox, sw, orientation = Widgets.get_oriented_box(container)
        vbox.set_border_width(4)
        vbox.set_spacing(2)

        # Take a text widget to show some instructions
        self.msgFont = self.fv.getFont("sansFont", 12)
        tw = Widgets.TextArea(wrap=True, editable=False)
        tw.set_font(self.msgFont)
        self.tw = tw

        # Frame for instructions and add the text widget with another
        # blank widget to stretch as needed to fill emp
        fr = Widgets.Frame("Status")
        vbox2 = Widgets.VBox()
        vbox2.add_widget(tw)
        vbox2.add_widget(Widgets.Label(''), stretch=1)
        fr.set_widget(vbox2)
        vbox.add_widget(fr, stretch=0)

        # Add a spacer to stretch the rest of the way to the end of the
        # plugin space
        spacer = Widgets.Label('')
        vbox.add_widget(spacer, stretch=1)

        # scroll bars will allow lots of content to be accessed
        top.add_widget(sw, stretch=1)

        # A button box that is always visible at the bottom
        btns = Widgets.HBox()
        btns.set_spacing(3)

        # Add a close button for the convenience of the user
        btn = Widgets.Button("Close")
        btn.add_callback('activated', lambda w: self.close())
        btns.add_widget(btn, stretch=0)
        btns.add_widget(Widgets.Label(''), stretch=1)
        top.add_widget(btns, stretch=0)

        # Add our GUI to the container
        container.add_widget(top, stretch=1)
        # NOTE: if you are building a GUI using a specific widget toolkit
        # (e.g. Qt) GUI calls, you need to extract the widget or layout
        # from the non-toolkit specific container wrapper and call on that
        # to pack your widget, e.g.:
        #cw = container.get_widget()
        #cw.addWidget(widget, stretch=1)

    def get_channel_info(self, fitsimage):
        chname = self.fv.get_channelName(fitsimage)
        chinfo = self.fv.get_channelInfo(chname)
        return chinfo

    def set_info(self, text):
        self.tw.set_text(text)

    # CALLBACKS

    def add_channel(self, viewer, chinfo):
        """
        Callback from the reference viewer shell when a channel is added.
        """
        self.set_info("Channel '%s' has been added" % (
                chinfo.name))
        # Register for new image callbacks on this channel's canvas
        fitsimage = chinfo.fitsimage
        fitsimage.set_callback('image-set', self.new_image_cb)

    def delete_channel(self, viewer, chinfo):
        """
        Callback from the reference viewer shell when a channel is deleted.
        """
        self.set_info("Channel '%s' has been deleted" % (
                chinfo.name))
        return True

    def focus_cb(self, viewer, fitsimage):
        """
        Callback from the reference viewer shell when the focus changes
        between channels.
        """
        chinfo = self.get_channel_info(fitsimage)
        chname = chinfo.name

        if self.active != chname:
            # focus has shifted to a different channel than our idea
            # of the active one
            self.active = chname
            self.set_info("Focus is now in channel '%s'" % (
                self.active))
        return True

    def new_image_cb(self, fitsimage, image):
        """
        Callback from the reference viewer shell when a new image has
        been added to a channel.
        """
        chinfo = self.get_channel_info(fitsimage)
        chname = chinfo.name

        # Only update our GUI if the activity is in the focused
        # channel
        if self.active == chname:
            imname = image.get('name', 'NONAME')
            self.set_info("A new image '%s' has been added to channel %s" % (
                imname, chname))
        return True

    def start(self):
        """
        This method is called just after ``build_gui()`` when the plugin
        is invoked.  This method could be called more than once if the
        plugin is opened and closed.  This method may be omitted
        in many cases.
        """
        pass

    def stop(self):
        """
        This method is called when the plugin is stopped.
        It should perform any special clean up necessary to terminate
        the operation.  This method could be called more than once if
        the plugin is opened and closed, and may be omitted if there is no
        special cleanup required when stopping.
        """
        pass

    def close(self):
        self.fv.stop_global_plugin(str(self))
        return True
Writing Separately Installable Plugins
If you want to distribute your plugin(s) as a separately installable package and have Ginga discover them when it starts up, you can use the Ginga Plugin Template to write your own package that installs plugins.
You can include as many plugins in your package as you want. You write your plugins in exactly the same way as described above, and they can be either global or local. For details, clone the repo at the link above and follow the directions in the README.