Using the Basic Ginga Viewer Object in Python Programs
The core design principle of the Ginga project is to make it possible to easily build powerful image viewers in Python with many possible GUI toolkits.
This chapter is for developers who want to use only the Ginga rendering class in a program of their own design (not customizing the reference viewer).
Using the basic rendering class in new programs
Ginga basically follows the Model-View-Controller (MVC) design pattern,
that is described in more detail in the chapter on internals
(see Ginga Internals).
The “view” classes are rooted in the base class ImageView.
Ginga supports backends for different widget sets through various
subclasses of this class.
Typically, a developer picks a GUI toolkit that has a supported backend
(Gtk 3, Qt 5/6, Tk, matplotlib, HTML5 canvas) and writes a GUI program
using that widget set with the typical Python toolkit bindings and API.
Where they want a image view pane they instantiate the appropriate
subclass of ImageView (usually a CanvasView), and using the
get_widget() call extract the native widget and insert it into the
GUI layout. A reference should also be kept to the view object, as this
is typically what you will be calling methods on to control the viewer
(see Ginga Image Viewer Operations).
Ginga does not create any additional GUI components beyond the image
pane itself, however it does provide a standard set of keyboard and
mouse bindings on the host widget that can be enabled, disabled or
changed. The user interface bindings are configurable via a pluggable
Bindings class which constitutes the “controller” part of the MVC
design. There are a plethora of callbacks that can be registered,
allowing the user to create their own custom user interface for
manipulating the view. Of course, the developer can add many different
GUI widgets from the selected toolkit to supplement or replace these
built in controls.
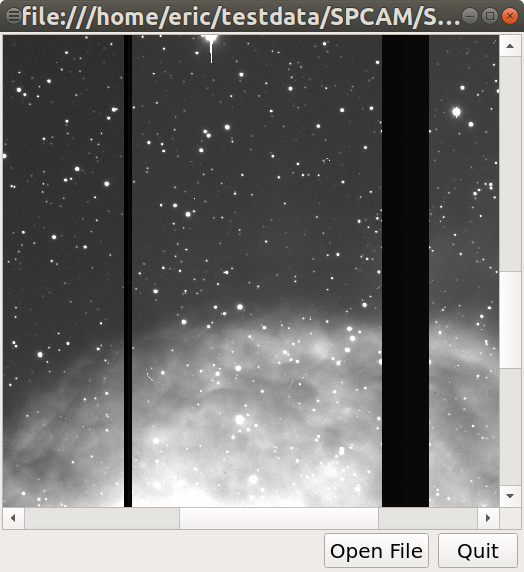
A simple, “bare bones” FITS viewer written in Qt.
Listing 1 shows a code listing for a simple graphical FITS
viewer built using the subclass CanvasView from the module
ImageViewQt (screenshot in Figure A simple, “bare bones” FITS viewer written in Qt.) written in
around 100 or so lines of Python. It creates a window containing an
image view and two buttons. This example will open FITS files dragged
and dropped on the image window or via a dialog popped up when clicking
the “Open File” button.
#! /usr/bin/env python
#
# example1_qt.py -- Simple FITS viewer using the Ginga toolkit
#                       and Qt widgets.
#
import sys

from ginga.misc import log
from ginga.qtw.QtHelp import QtGui, QtCore
from ginga.qtw.ImageViewQt import CanvasView, ScrolledView
from ginga.util.loader import load_data


class FitsViewer(QtGui.QMainWindow):

    def __init__(self, logger):
        super(FitsViewer, self).__init__()
        self.logger = logger

        # create the ginga viewer and configure it
        fi = CanvasView(self.logger, render='widget')
        fi.enable_autocuts('on')
        fi.set_autocut_params('zscale')
        fi.enable_autozoom('on')
        fi.set_callback('drag-drop', self.drop_file)
        fi.set_bg(0.2, 0.2, 0.2)
        fi.ui_set_active(True)
        self.fitsimage = fi

        # enable some user interaction
        bd = fi.get_bindings()
        bd.enable_all(True)

        w = fi.get_widget()
        w.resize(512, 512)

        # add scrollbar interface around this viewer
        sw = ScrolledView(fi)

        vbox = QtGui.QVBoxLayout()
        vbox.setContentsMargins(QtCore.QMargins(2, 2, 2, 2))
        vbox.setSpacing(1)
        vbox.addWidget(sw, stretch=1)

        hbox = QtGui.QHBoxLayout()
        hbox.setContentsMargins(QtCore.QMargins(4, 2, 4, 2))

        wopen = QtGui.QPushButton("Open File")
        wopen.clicked.connect(self.open_file)
        wquit = QtGui.QPushButton("Quit")
        wquit.clicked.connect(self.quit)

        hbox.addStretch(1)
        for w in (wopen, wquit):
            hbox.addWidget(w, stretch=0)

        hw = QtGui.QWidget()
        hw.setLayout(hbox)
        vbox.addWidget(hw, stretch=0)

        vw = QtGui.QWidget()
        self.setCentralWidget(vw)
        vw.setLayout(vbox)

    def load_file(self, filepath):
        image = load_data(filepath, logger=self.logger)
        self.fitsimage.set_image(image)
        self.setWindowTitle(filepath)

    def open_file(self):
        res = QtGui.QFileDialog.getOpenFileName(self, "Open FITS file",
                                                ".", "FITS files (*.fits)")
        if isinstance(res, tuple):
            fileName = res[0]
        else:
            fileName = str(res)
        if len(fileName) != 0:
            self.load_file(fileName)

    def drop_file(self, fitsimage, paths):
        fileName = paths[0]
        self.load_file(fileName)

    def quit(self, *args):
        self.logger.info("Attempting to shut down the application...")
        self.deleteLater()


def main(options, args):

    app = QtGui.QApplication(sys.argv)

    # ginga needs a logger.
    # If you don't want to log anything you can create a null logger by
    # using null=True in this call instead of log_stderr=True
    logger = log.get_logger("example1", log_stderr=True, level=40)

    w = FitsViewer(logger)
    w.resize(524, 540)
    w.show()
    app.setActiveWindow(w)
    w.raise_()
    w.activateWindow()

    if len(args) > 0:
        w.load_file(args[0])

    app.exec_()


if __name__ == '__main__':
    main(None, sys.argv[1:])
Looking at the constructor for this particular viewer, you can see where
we create a CanvasView object. On this object we enable automatic
cut levels (using the ‘zscale’ algorithm), configure it to auto zoom the
image to fit the window and set a callback function for files dropped on
the window. We extract the user-interface bindings with
get_bindings(), and on this object enable standard user interactive
controls for all the possible key and mouse operations.
We then extract the platform-specific widget (Qt-based, in this case) using
get_widget() and pack it into a Qt container along with a couple of
buttons to complete the viewer.
Scanning down the code a bit, we can see that whether by dragging and
dropping or via the click to open, we ultimately call the load_file()
method to get the data into the viewer. load_file() creates
an AstroImage object (the “model” part of our MVC design), which is
then passed to the viewer via the set_image() method.
AstroImage objects have methods for ingesting data via a file path, an
astropy.io.fits HDU or a bare Numpy data array. For a reference
on the model, see here:ref:_ch-image-data-wrappers.
Many of these sorts of examples for all supported backends are contained
in the examples directory in the source distribution.
For a list of many methods provided by the viewer object see
this reference Ginga Image Viewer Operations. You can also click on the
module index link at the top of this chapter and then click on the link
for ImageViewBase.
Graphics plotting with Ginga
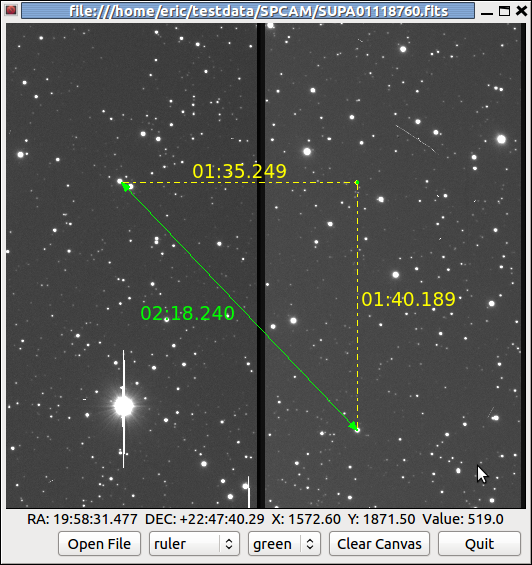
An example of a CanvasView widget with graphical overlay.
A CanvasView actually pairs a view with a canvas object (in
particular a DrawingCanvas object). You can get more detail about
canvases and the objects they support (see Ginga Canvas Graphics).
A variety of graphical shapes are available, and plotted objects scale,
transform and rotate seamlessly with the viewer.
Rendering into Matplotlib Figures
Ginga can also render directly into a Matplotlib Figure, which opens up possibilities for overplotting beyond the limited capabilities of the Ginga canvas items. See the examples under “examples/matplotlib” for ideas, particularly “example4_mpl.py”.
Rendering into HTML5 canvases
Ginga can render onto HTML5 canvases displayed in a web browser. This opens up interesting possibilities for server-based remote viewing tools. See the examples under “examples/pg”, particularly “example2_pg.py”.
Writing widget toolkit independent code
You can write code that allows the widget set to be abstracted by Ginga’s widget wrappers. This is the same technique used to allow the reference viewer to switch between supported toolkits using the “-t” command line option. Currently only Qt (5/6), Gtk (3/4), and HTML5 (to a more limited degree) are supported, and there are some limitations compared to developing using a native toolkit directly. Nevertheless, the ability to target different platforms just by changing a command line option is a very interesting proposition.
See the examples under “examples/gw”, particularly “example2.py”.