PixTable
PixTable provides a way to check or monitor the pixel values in
a region.
Plugin Type: Local
PixTable is a local plugin, which means it is associated with a channel.
An instance can be opened for each channel.
Basic Use
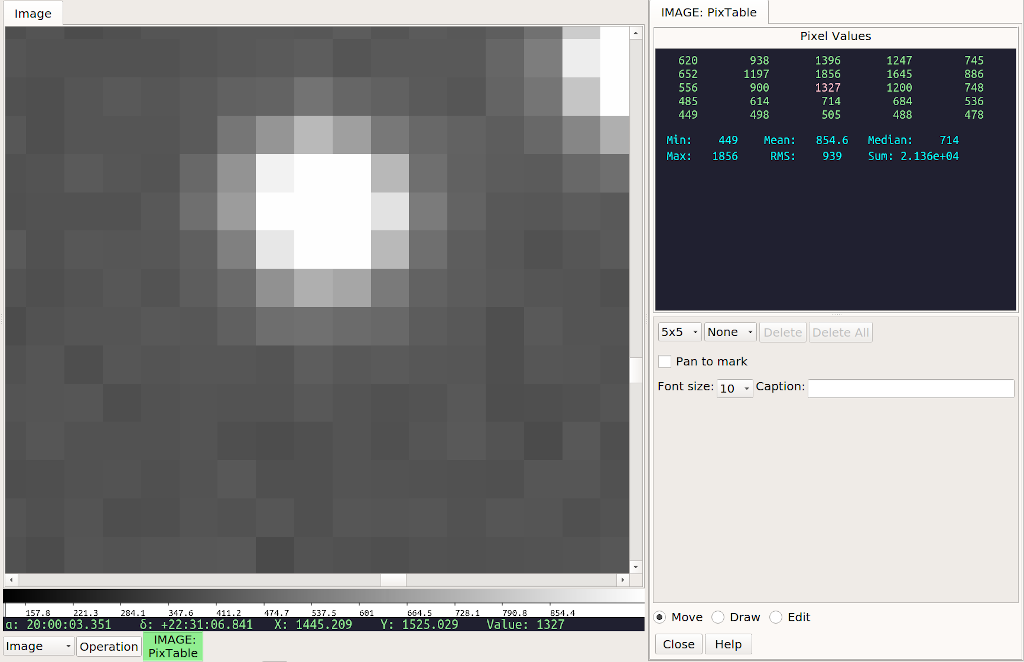
In the most basic use, simply move the cursor around the channel viewer; an array of pixel values will appear in the “Pixel Values” display in the plugin UI. The center value is highlighted, and this corresponds to the value under the cursor.
You can choose a 3x3, 5x5, 7x7, or 9x9 grid from the left-most combobox control. It may help to adjust the “Font Size” control to prevent having the array values cut off on the sides. You can also enlarge the plugin workspace to see more of the table.
Note
The order of the value table shown will not necessarily match to the channel viewer if the images is flipped, transposed, or rotated.
Using Marks
When you set and select a mark, the pixel values will be shown surrounding the mark instead of the cursor. There can be any number of marks, and they are each noted with a numbered “X”. Simply change the mark drop down control to select a different mark and see the values around it. The currently selected mark is shown with a different color than the others.
The marks will stay in position even if a new image is loaded and they will show the values for the new image. In this way you can monitor the area around a spot if the image is updating frequently.
If the “Pan to mark” checkbox is selected, then when you select a different mark from the mark control, the channel viewer will pan to that mark. This can be useful to inspect the same spots in several different images, especially when zoomed in tight to the image.
Note
If you change the mark control back to “None”, then the pixel table will again update as you move the cursor around the viewer.
The “Caption” box can be used to set a text annotation that will be appended to the mark label when the next mark is created. This can be used to label a feature in the image, for example.
Deleting Marks
To delete a mark, select it in the mark control and then press the button marked “Delete”. To delete all the marks, press the button marked “Delete All”.
Moving Marks
When the “Move” radio button is checked, and a mark is selected, then clicking or dragging anywhere in the image will move the mark to that location and update the pixel table. If no mark is currently selected then a new one will be created and moved.
Drawing Marks
When the “Draw” radio button is checked, then clicking and dragging creates a new mark. The longer the draw, the bigger radius of the “X”.
Editing Marks
When the “Edit” radio button is checked after a mark has been selected then you can drag the control points of the mark to increase the radius of the arms of the X or you can drag the bounding box to move the mark. If the editing control points are not shown, simply click on the center of a mark to enable them.
Special Keys
In “Move” mode the following keys are active: - “n” will place a new mark at the site of the cursor - “m” will move the current mark (if any) to the site of the cursor - “d” will delete the current mark (if any) - “j” will select the previous mark (if any) - “k” will select the next mark (if any)
User Configuration
It is customizable using ~/.ginga/plugin_PixTable.cfg, where ~
is your HOME directory:
#
# PixTable plugin preferences file
#
# Place this in file under ~/.ginga with the name "plugin_PixTable.cfg"

# Default font
font = 'fixed'

# Default font size
fontsize = 12

# default size for mark point radius
mark_radius = 10

# style of point to draw
mark_style = 'cross'

# color of non-selected marks
mark_color = 'purple'

# color of selected mark
select_color = 'cyan'

# whether to update the pixel table when moving a mark around
drag_update = True